

The 7-day trial includes 25 credits, one website, and website health and security checks. Steps 3 to 6 require a paid plan; the interactive 3D avatar requires Growth or Scale. See Free Trial and Access.
Step 1: Log In
Open the WOWagent panel and log in. Login URL: https://portal.wowagent.ai/login New user: Create your account on the Sign Up page, verify your email within 24 hours, and then log in with your email and password. For full steps and field rules, see Signup. Google login: Click Continue with Google and use the same email every time. If it is your first time, accept the Terms when asked. Team invite: If your team invited you, open the invitation link from your email:- New to WOWagent: Enter your name and password, accept the Terms, and click Accept invitation.
- Already have an account: Log in first, then accept the invitation and join the workspace.
Invalid email or password: Check for extra spaces, capital letters, and that you are using the correct email.Please verify email: Click Resend, check your inbox, verify your email, and then log in.Session expired: Log in again.- Forgot your password? Reset it with the link sent to your email. The link is valid for 1 hour. See Forgot Password.
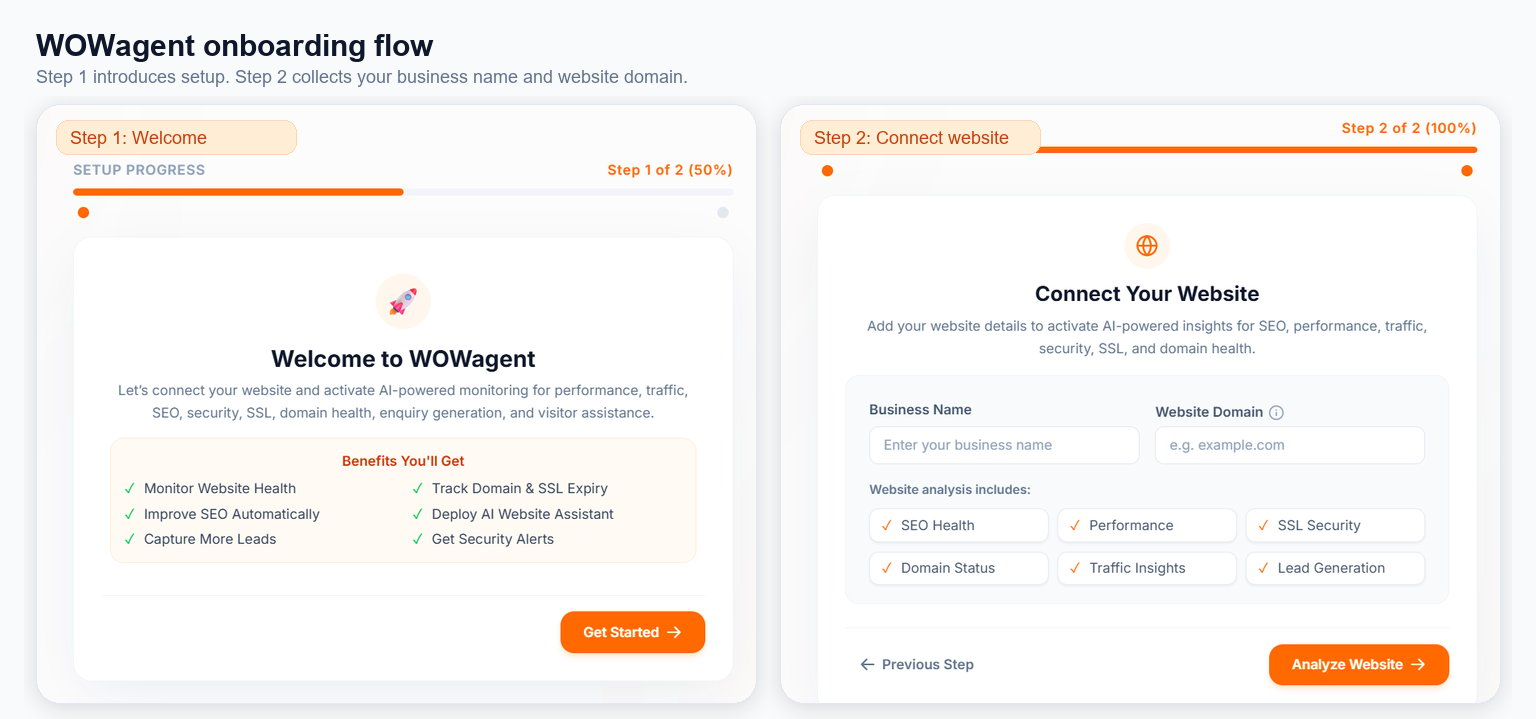
Step 2: Add Your Website
Open onboarding: https://portal.wowagent.ai/onboard1
Click Get Started
Select the correct workspace if asked.
2
Enter Business Name
Use the official name your customers know, for example WOWagent. This field is required and allows up to 40 characters.
3
Enter a clean domain
Example: example.comDo not enter a full URL such as https://example.com or a page address such as www.example.com/contact.
4
Click Analyze Website
Wait 5 to 15 seconds and do not double-click. When it succeeds, you see Website Added Successfully and go to the main panel.
invalid domain: Type the domain again in the formatexample.com.already registered by you: Select the website from the website switcher instead of adding it again.PLAN_LIMIT_EXCEEDED: Your plan has reached its website limit. Go to Billing to upgrade. Only the workspace owner can do this.site not live: Open your domain in an incognito window and fix any DNS, hosting, or SSL issues first. A website running only on your own computer (localhost) will fail.
Step 3: Complete Integration Center
Open Integration Center: https://portal.wowagent.ai/website/integrationsSelect your website from the website switcher first. Otherwise, the page is empty.
- Widget verification: Copy the widget script (
<script src=...widget.js data-key=...>) and paste it before the closing</head>tag on your website, in your WordPress header and footer settings, or in a GTM Custom HTML tag. Then click Verify. The status must turn green, because live chat never appears without this step. For full steps, see Install Widget. - Pixel setup: If shown, copy the pixel code and add it to your website’s head section. It is used for tracking.
- Google Analytics: Click Connect, allow access with your Google account, select your property, and click Save. You need this for traffic insights.
- Tag Manager: Connect your container if you use GTM to add the widget.
- Search Console: Connect it to get keyword data and submit your sitemap.
- Blog or publishing setup: Only needed if you use AI blogs. Set up the Cloudflare path, add the DNS CNAME record, and click Verify.
- DNS or Cloudflare setup (if required): Add the CNAME or TXT record shown to your domain’s DNS (for example, at GoDaddy, Cloudflare, or Hostinger). Wait 5 to 30 minutes, then click Verify.
Step 4: Train Your Assistant
Open Knowledge Base: https://portal.wowagent.ai/ai-agent/knowledge-base For good answers, add at least the following:- Business profile: Name, about, location, contact details, website, and social links. The assistant uses this in answers and reports.
- Business hours: Opening and closing times for each day, your timezone, and holidays. The assistant uses this to answer questions about when you are available.
- Products and services: At least 1 to 2 items, each with a name, description, price, and link. You need these for product questions.
- FAQs: At least 5 real customer questions and answers, covering pricing, contact, delivery, refunds, and timings.
- Website pages: 3 to 5 important URLs to crawl, such as your home, pricing, contact, and services pages. WOWagent reads these pages to train your assistant.
- Documents: Upload PDF or DOCX files such as policies, brochures, or menus. Wait until processing is complete.
- Bot boundaries: Set what the assistant must NOT do (for example, no fake discounts, no legal advice, and hand off to a person when unsure), along with tone and handoff rules.
Step 5: Configure Chatbot
Open Chatbot Management: https://portal.wowagent.ai/ai-agent Set up:- Bot name: For example, “WOW Helper”. It is shown in the widget header.
- Avatar Username: Set an available username below Bot Name and click the Save button beside the field. This is required before saving the remaining chatbot settings. See Avatar Username.
- Welcome greeting: The first message visitors see. For example, “Hi! How can I help you today?”
- Conversational tone: Friendly, Professional, or Playful. It must match your brand.
- Language selection: The default chat language and other supported languages.
- Widget layout: Position (bottom right or bottom left), color, and style (bubble or full window).
- Widget style: Primary color, avatar shape, and header text.
- Behavior settings: Turn the pre-chat form ON or OFF (it collects the visitor’s name and phone number before the chat), and set auto start and the feedback form.
- Avatar options: For the 3D layout on Growth or Scale, choose Nexa, Zoya, or Kabir and test its configured voice. Set Half Body or Full Body framing, plus desktop and mobile widget sizes.
Step 6: Test Everything
Before going live, test in 2 places: the Sandbox and your live website. Test checklist:- Common customer questions: Ask 5 of the FAQs you added. The answers must match.
- Contact and pricing questions: Check that the phone number, email, and prices are accurate.
- Product or service questions: Check that the product links work.
- Business hours: Ask “Are you open on Sunday?”. The answer must match your hours.
- Form submissions: Fill in a test form and check that the entry appears in Forms, under Submissions.
- Lead capture: Chat as a visitor with the pre-chat form turned on, and check that the entry appears in Leads.
- Website widget visibility: Open your live website in an incognito window. The widget must appear in the bottom corner, open and close correctly, work on mobile, and not be blocked by your website’s security settings.
If the live widget is missing: Check that the script is in the head section and has the correct
data-key, clear your cache, turn off your ad blocker, and click Verify again in Integration Center.If answers are wrong: Fix the Knowledge Base, re-crawl your pages, and test again.Step 7: Monitor Results
After setup, check these areas regularly: every day during the first week, then every week.- Dashboard: Leads, traffic, the 30-day activity feed, and credits left.
- Website Overview: Audit scores. Click Re-scan after making changes, and download the PDF report to share with clients.
- SEO Intelligence: Domain, keywords, competitors, backlinks, and AI visibility. Click Re-Crawl after updating your content.
- Customer Inbox: Reply to chats, take over high-value chats, and check ratings.
- Billing: Your plan, eligible coupons, credit top-ups (
100/500/1000), transactions, and downgrade checks. When credits run low, scans stop. - Support and Activity: Track tickets through Open, In Progress, Waiting, and Resolved, add attachments, and review recorded account changes.
Add Your Website
Fix domain issues.
Integration Center
Verify the widget and connect Google.